-
웹 크롤링 데이터를 MySQL에 저장하기Project 2023. 7. 3. 12:08728x90
Mac에 Mysql 설치
brew install mysql

brew install mysql-client
MySQL 실행
$ mysql.server startMysql 데이터베이스 및 유저 생성
mysql > CREATE DATABASE crawl_data DEFAULT CHARACTER SET utf8;

mysql > CREATE USER crawl_usr IDENTIFIED BY 'Test001';
exit 입력 후, Python으로 Mysql 접속 코드 만들기
import MySQLdb

conn = MySQLdb.connect(
    user="crawl_usr",
    passwd="Test001",
    host="localhost",
    db="crawl_data"
    # charset="utf-8"
)
print(type(conn))
# <class 'MySQLdb.connections.Connection'>
cursor = conn.cursor()
print(type(cursor))
# <class 'MySQLdb.cursors.Cursor'>
cursor.execute("CREATE TABLE books (title text, url text)")
conn.commit()
이 과정에서 MacOS의 경우 MySQLdb가 설치되지 않는 경우가 있다. 이럴 때는 파이썬 스크립트 위에 다음과 같은 명령을 추가 입력한다.
import pymysql
pymysql.install_as_MySQLdb()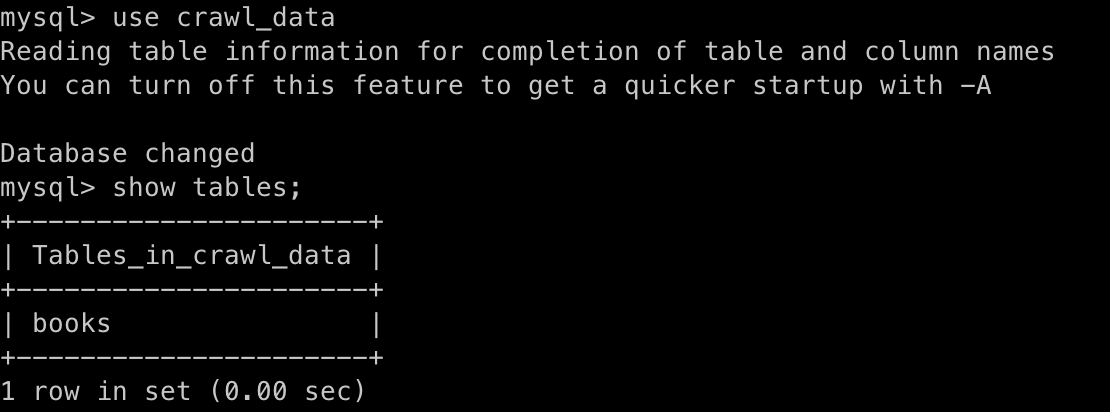
다음과 같이 books 테이블이 생성된 것을 알 수 있다.
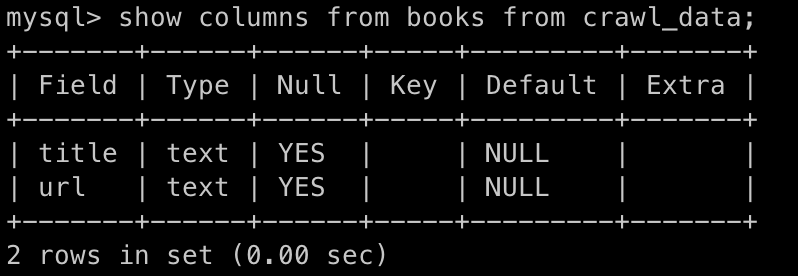
books table 내 칼럼들도 잘 지정되어 있음을 알 수 있다.
그리고 다음과 같이 books table에 하나의 튜플을 집어넣어보자.
import MySQLdb

conn = MySQLdb.connect(
    user="crawl_usr",
    passwd="Test001",
    host="localhost",
    db="crawl_data"
    # charset="utf-8"
)
cursor = conn.cursor()
bookname = "처음 시작하는 파이썬"
url_name = "www.wikibook.co.kr"
cursor.execute(f"INSERT INTO books VALUES(\"{bookname}\",\"{url_name}\")")
conn.commit()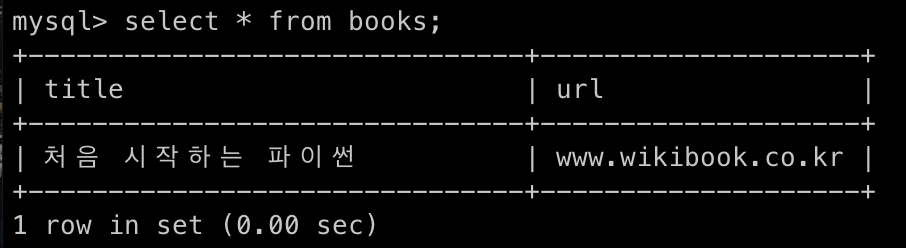
select를 이용해 쿼리를 하게 되면, 다음과 같은 결과가 나온다.
다음 코드는 실행할 때마다 다른 실행결과가 나타나지 않게 하는 것이다.
import MySQLdb

conn = MySQLdb.connect(
    user="crawl_usr",
    passwd="Test001",
    host="localhost",
    db="crawl_data"
    # charset="utf-8"
)
# 커서 생성하기
cursor = conn.cursor()

# 실행할 때마다 다른값이 나오지 않게 테이블을 제거해두기
cursor.excute("DROP TABLE IF EXISTS books")

# 테이블 생성하기
cursor.execute("CREATE TABLE books (title text, url text)")

# 데이터 저장하기
bookname = "처음 시작하는 파이썬"
url_name = "www.wikibook.co.kr"
cursor.execute(f"INSERT INTO books VALUES(\"{bookname}\",\"{url_name}\")")
# 커밋하기
conn.commit()
# 연결종료하기
conn.close()
다음은 멜론 차트 100을 크롤링한 후 db에 저장하는 코드다.
import MySQLdb
import requests
from bs4 import BeautifulSoup

if __name__ == "__main__":
    RANK = 100  # 멜론 차트 순위가 1 ~ 100위까지 있음

    header = {
        'User-Agent': 'Mozilla/5.0 (Windows NT 6.3; Trident/7.0; rv:11.0) like Gecko'}
    req = requests.get('https://www.melon.com/chart/week/index.htm',
                       headers=header)  # 주간 차트를 크롤링 할 것임
    html = req.text
    parse = BeautifulSoup(html, 'html.parser')

    titles = parse.find_all("div", {"class": "ellipsis rank01"})
    singers = parse.find_all("div", {"class": "ellipsis rank02"})

    title = []
    singer = []

    for t in titles:
        title.append(t.find('a').text)

    for s in singers:
        singer.append(s.find('span', {"class": "checkEllipsis"}).text)
    items = [item for item in zip(title, singer)]

conn = MySQLdb.connect(
    user="crawl_usr",
    passwd="Test001",
    host="localhost",
    db="crawl_data"
    # charset="utf-8"
)
# 커서 생성
cursor = conn.cursor()

# 실행할 때마다 다른값이 나오지 않게 테이블을 제거해두기
cursor.execute("DROP TABLE IF EXISTS melon")

# 테이블 생성하기
cursor.execute("CREATE TABLE melon (`rank` int, title text, url text)")
i = 1
# 데이터 저장하기
for item in items:
    cursor.execute(
        f"INSERT INTO melon VALUES({i},\"{item[0]}\",\"{item[1]}\")")
    i += 1

# 커밋하기
conn.commit()
# 연결종료하기
conn.close()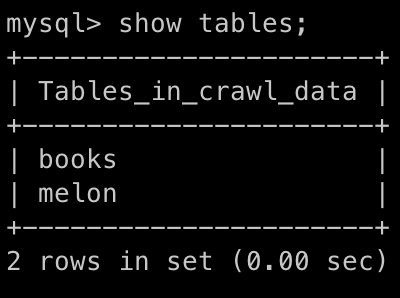
코드를 실행하게 되면 melon 테이블이 생성된 것을 알 수 있다.
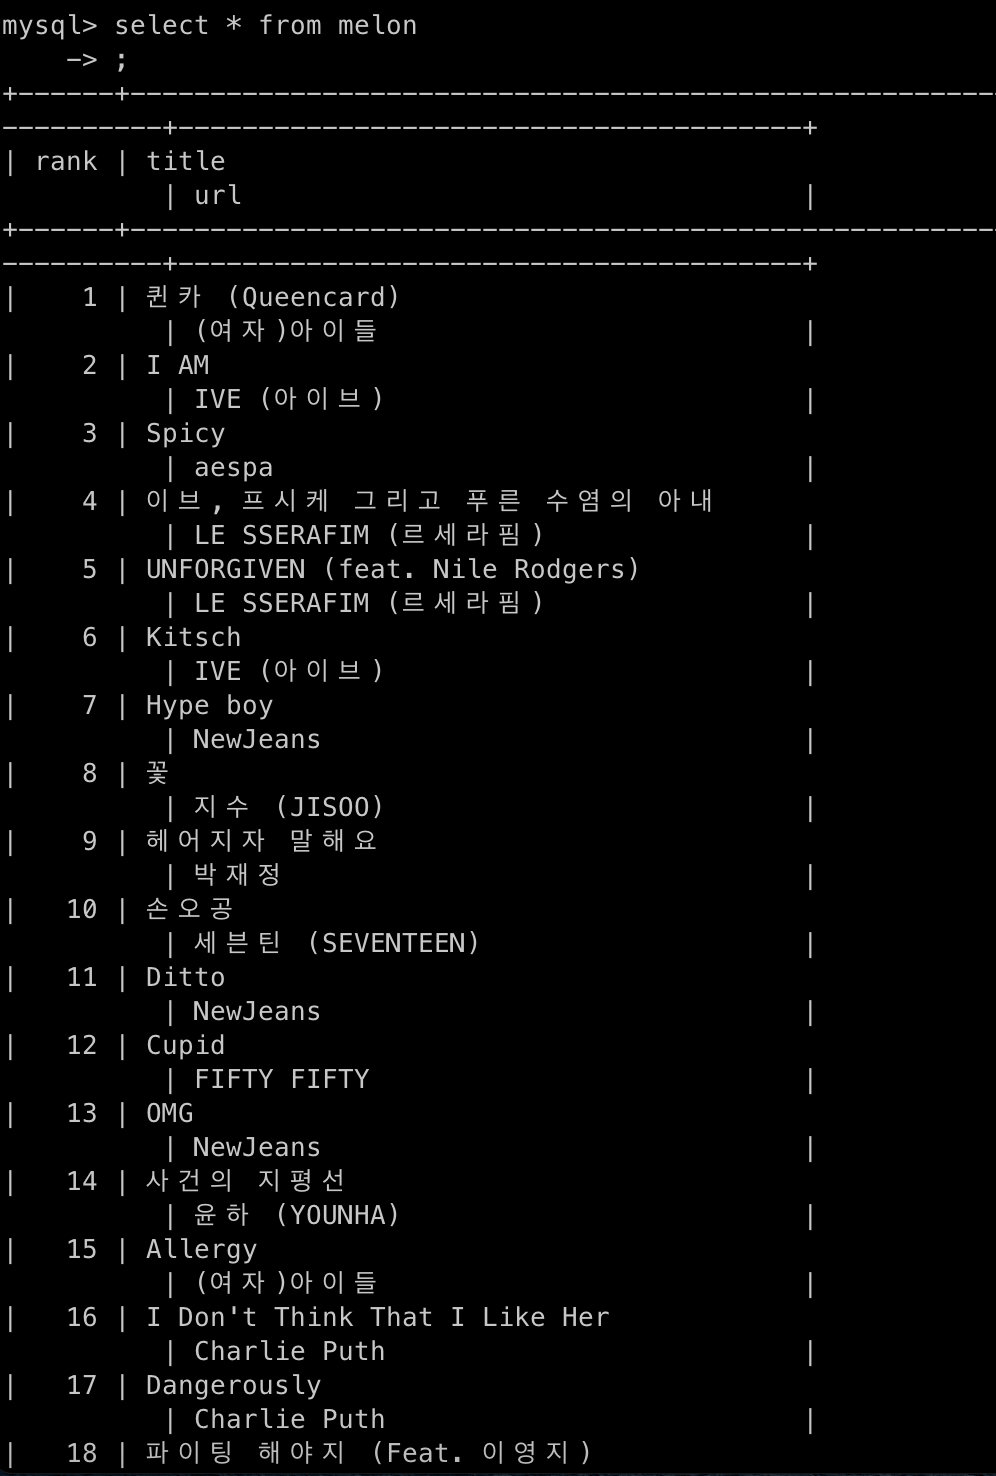
이런 식으로 멜론 탑 100 차트를 확인할 수 있다.
728x90'Project' 카테고리의 다른 글
웹 크롤러 설계 (0) 2023.07.12 [Parsing] Scrapy를 활용하여 웹 스크래핑 하기 (0) 2023.07.09 PySpider (0) 2023.07.08 Requests 알아보기 (0) 2023.06.28 Client와 Server, REST API, JSON (0) 2023.06.26